Photographing Trade Show and Exhibit Booths the Professional Way
Exhibit Booth Photography can be a lucrative opportunity for an event photographer. It can also be deceptively difficult to do it right. Large or small, exhibit booths are a critical part of trade show and conventions and therefore, an important investment worth photographing. Exhibit booth companies spend a lot of time and research creating and designing booths that are not only functional, but also aesthetically pleasing and ergonomically designed. Business, big and small look to exhibit and trades shows and invest ever-increasing amounts of time and money using these booths to attract and educate their new and potential customers and clients. The importance of excellent professional booth photography and photographers can’t be overstated.
Exhibit booth photography can be deceptively complicated. What do I mean by that? Camera and Photoshop, What else is there right? Well, the truth is that though you might be able to get by with that, to truly separate your work from the average, and keep your clients coming back, there is a lot more you should be doing.
The Basics. Camera, Lens, Tripod
Let’s start with the basics. Camera, tripod, and lens. What kind of camera should you be using? My choice, a digital 35mm Slr and here is why. It’s not about the sensor, quality or speed, but in the flexibility. Raw files, aperture control, HDR, color temperature, lens type, cable release, tripod mount, on-camera flash, and a bubble level. These are all important features you may or may not need when shooting booths. With a digital SLR, you have these options. It’s also about accessories and adaptability. Bubble levels, polarizing filters, tripod mounts, and a cable release, are all important accessories I consider must-haves for booth photography.
Lens choice is the second basic. Wide, super wide, telephoto or even a tilt and shift, having the flexibility of varying focal lengths is critical to taking booth photography to a level your competition isn’t. The space you have to work in, the size of the booth, and obstacles around the booth are all factors you can adapt to and mitigate when you have the proper arsenal of lenses. Much of photography is about problem-solving. Having options allows you to solve those problems easily and professionally.

The Tripod. A Most Versatile Tool
Having a tripod and a camera you can easily mount is critical to professional exhibit booth photography. From low light to HDR and exposure bracketing, to depth of field and focus considerations, a sturdy, adaptable tripod gives you incredible flexibility and is an outstanding problem-solving tool. I always shoot booths and architecture in manual mode. This includes manual focus. I also use a cable release to avoid any kind of camera shake. You can use the 2-second time shutter release option in a pinch, but with a cable release, I can fire when I need to letting me time my shots during playbacks on monitors and screens or to avoid people walking into my shots. Here are just some of the benefits of having a tripod-mounted camera.
- Low light, no problem. It allows for slower shutter speeds.
- Lower ISO, better image quality.
- Large of depth of field, small aperture, lots of focus and detail.
- It allows me to use a polarizer on the lens to avoid glare and reflection.
- Can shoot in HDR or multi exposures for stacking in post.
High Dynamic Range in Exhibit Booth Photography
HDR (High Dynamic Range) or stacking multi exposures in post, allows you to compensate for areas of highlights and shadows and increases the exposure range of your images. This creates images that capture much more details of a booth than a single exposure can. I remember in the days of film, if I wanted this kind of dynamic range, I would need to bring an arsenal of portable lighting to even things out. With an average exposure, spotlighted features, screens, and monitors are blown out. Exposing for the monitors and highlights leaves the rest of the image dark and underexposed. This in turn creates unacceptable levels of noise in the shadows as you try to bring them up to proper levels in post. At best, you create a lot of extra work in post as you try to make things look their best. My advice is to learn to use your camera’s HDR functions. They do a pretty good job and with just a little tweaking in post, can give you very acceptable results. Just be careful not to overdo it. In my opinion, there is nothing worse than an overcooked HDR image. Keep it real.
Having your camera mounted on a tripod allows you to use a circular polarizer. As far as I know, there are no Lightroom or Photoshop actions that adequately replicate the magic effects of having a polarizer on the front for your lens. Why a polarizer? One work, Glare. You can eliminate glare and reflections on shiny surfaces restoring color and detail Polarizers are also great at darkening monitors and screens allowing you a certain amount of control over their brightness which in turn allows the exposure and range to even out throughout the image.

Simple but Effective Tips for Exhibit Booth Photography
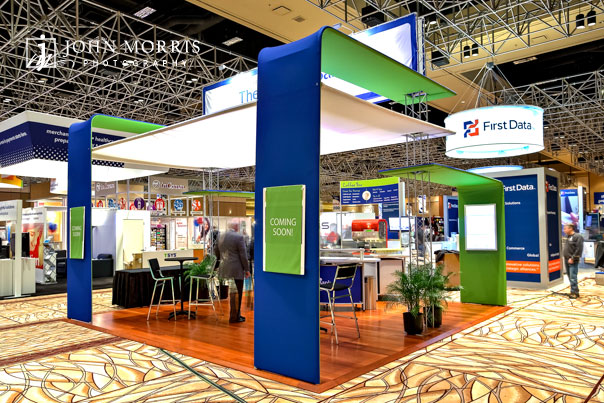
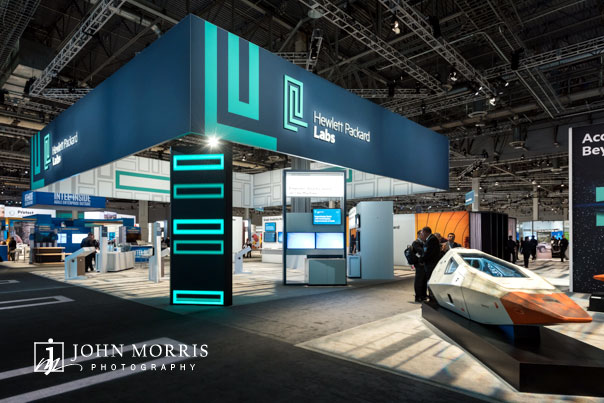
Here are some simple, but important tips that will take your exhibit booth photography to the next level. Consider the space you will have to work in. This is important and will help you determine the kind of lens and what angles are best. In a perfect world, every booth would sit in a convention hall all by itself with ample space for you to walk around but in reality, they are usually crammed into 10×10 or 10×20 spaces, nudged up against each other and hidden behind giant support columns and room dividers.
Bubble levels. Leveling the camera prevents unwanted perspective distortion and makes the Lightroom lens correction tool more effective. Which leads us to another tip. Use Lightroom’s lens correction tool for perspective. Using this tool doesn’t replace a traditional tilt and shift completely but if you keep your camera level and square to your subject and give your self a little space around the edges of the frame with you shoot, it can be almost as effective and in most cases does a great job.
Approach your exhibit booth photography like you would an interior shoot. While working with a very successful interior architectural photographer, I picked up a few tricks that I apply to my booth photography. Walk the booth first. Do a complete 360 of your booth when possible looking for the most attractive features and angles. Look for background and foreground distractions and opportunities. Looking for annoying spotlights, impediments, distracting signage, and lighting helps you to avoid any unwanted and unnecessary elements in your photograph. I have found that shooting booths from side angles that include at least two sides of the booth looks best. Sometimes companies want straight on shots so make sure you get those, but the beauty shots are generally from angles.

Clean the booth, remove trashcans, water bottles and any other distractions. Straighten literature racks and handouts. Organize and rearrange furniture and chairs, if necessary, to hide ugly and reveal booth highlights and features. Turn on any monitors or TV’s whenever possible. I push for this in my pre-shoot discussions and try to have a technician or company representative on hand to help me with this. Active screens and monitors can breathe life into a booth.
When the monitors or screens are on, be patient and try to capture something colorful and interesting on the screen. Look for company logos to appear and be ready to shoot. Usually, the content will repeat itself every few minutes so if you miss it the first time, just wait a few minutes and time it right. Remember, this is another time when having a polarizer helps. By turning the polarizer, you can adjust the brightness level of screens.
Look through the lens while you turn to get the desired effect. Trust me, try it on your TV at home. You will see what I am talking about.
A final note. Make sure your color temperature is right. There are whole lectures dedicated to the importance of color in logos and branding for corporations. Coke red IS a thing. Shoot an area of white in your booths so that you can adjust the color balance in post. Shoot in raw so that color balance becomes an easy adjustment. I probably should have put this earlier in my post but maybe since it’s at the end you will remember. Color balance is important. Make sure you get it right.
Well, hopefully, this post gave you some ideas and tips for shooting professional exhibit booth images. If you have any questions, please feel free to respond to this post with any questions you may have. You can aso check out more of my Exhibit Booth Photography here at http://www.johnmorrisevents.com/portfolio/trade-show/
Till next time…….